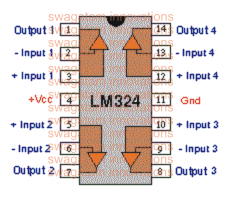
ในโพสต์นี้เราจะสร้างระบบกระดิ่งโรงเรียน / วิทยาลัยอัตโนมัติโดยใช้ Arduino จอแสดงผล 16 x 2 และโมดูลนาฬิกาแบบเรียลไทม์ คุณสามารถตั้งโปรแกรมให้โปรเจ็กต์นี้กดกริ่งได้ถึง 16 ครั้งต่อวันในชั่วโมงและนาทีที่คุณต้องการ ความยาวของกริ่งสามารถตั้งโปรแกรมได้เป็นวินาที
กำลังมองหาเวอร์ชันที่ง่ายกว่าโดยไม่ต้องเข้ารหัสหรือไม่? รับมัน ที่นี่
ภาพรวม
หมดยุคไปแล้วเมื่อดอกโบตั๋นในโรงเรียนส่งเสียงระฆัง 'กระป๋องดีบุก' และนักเรียนก็วิ่งออกจากประตูทางเข้าโรงเรียนด้วยสีสัน บางคนอาจมีความสุขมากขึ้นเมื่อเสียงระฆังดังขึ้นเมื่อไม่กี่นาทีก่อนหน้านี้
นี่เป็นสถานการณ์เมื่อ 15 ถึง 20 ปีที่แล้ว แต่ตอนนี้โรงเรียนและวิทยาลัยทุกแห่งมีเวลาผูกมัดอย่างเคร่งครัดและเสียงระฆังจะทำงานโดยอัตโนมัติ
วัยเด็ก / วัยรุ่นอย่างรวดเร็วของผู้แต่งจำไว้ว่า:
สมัยประถมและมัธยมของฉันนาฬิกาดิจิทัลที่ฉันสวมอยู่ได้ซิงโครไนซ์กับระบบกระดิ่งของโรงเรียนด้วยความแม่นยำ 1 วินาที
ฉันจะตะโกนว่า“ ระฆังจะดังในอีก 5 วินาที” หลังจากที่ระฆังดังนักเรียนทุกคนจ้องมาที่ฉันด้วยความประหลาดใจสิ่งนี้เกิดขึ้นเกือบทุกวัน ในบางวันฉันและเพื่อนสนิทเริ่มนับถอยหลัง 10, 9, 8, 7 … .. ก่อนระฆังสุดท้าย
เพื่อนของฉันทุกคนบอกว่ามันเป็นนาฬิกาข้อมือวิเศษ แต่พวกเขาไม่ได้ตระหนักถึงความจริงง่ายๆอย่างหนึ่งว่าระฆังโรงเรียนเป็นแบบอัตโนมัติ ฮ่า ๆ!!
เรากำลังจะสร้างกระดิ่งโรงเรียน / วิทยาลัยโดยใช้ Arduino
แสดงการเชื่อมต่อ Arduino
การแสดงผลไปยังการเชื่อมต่อ Arduino นั้นแตกต่างจากที่เราเชื่อมต่อกันเล็กน้อยโดยใช้หมุด 9, 8, 7, 6, 5 และ 4 ที่นี่ หมายเลขพิน 2 และ 3 ใช้เป็นฮาร์ดแวร์ขัดจังหวะผ่าน ปุ่มกด .
ใช้ 10K โพเทนชิออมิเตอร์ สำหรับการปรับความคมชัดสำหรับไฟล์ แสดง .


ข้อมูลโดยละเอียดเกี่ยวกับการเชื่อมต่อเบลล์และรีเลย์:

UPDATE: A5 เป็น SCL และ A4 เป็น SDA (ไม่ใช่ A4 ถึง SCK)
โมดูลนาฬิกาตามเวลาจริง
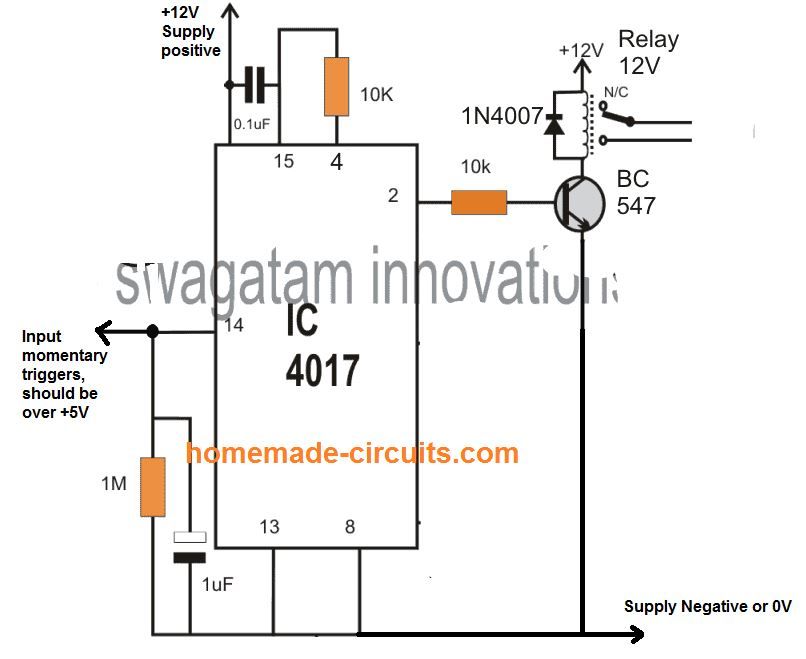
นาฬิกาตามเวลาจริง โมดูลจะติดตามเวลาแม้จะตัดไฟเป็นเวลานาน มีรีเลย์ 9V สำหรับเปิดและปิดกระดิ่ง
โปรดเชื่อมต่อไดโอด 1N4007 แบบไบแอสย้อนกลับข้ามรีเลย์ (ซึ่งไม่แสดงในแผนผัง) ซึ่งจะดูดซับ EMF แรงดันไฟฟ้าสูงที่เป็นอันตรายกลับจากรีเลย์
จ่ายไฟให้วงจรโดยใช้ไฟล์ อะแดปเตอร์ติดผนัง 9V / 500mA .
มีปุ่มกดสามปุ่มหนึ่งปุ่มสำหรับใช้งานกระดิ่งด้วยตนเองในบางสถานการณ์ การกดปุ่ม“ ออก” จะเป็นการหยุดกระดิ่งหลังจากกดกริ่งด้วยตนเอง
“ ปุ่มปิดการใช้งานกระดิ่ง” จะปิดการใช้งานระฆังตลอดไป หากต้องการเปิดใช้งานระฆังอีกครั้งให้กดปุ่ม“ ออก”
วิธีตั้งเวลาให้กับโมดูล RTC:
ดาวน์โหลดไลบรารี RTC:
ลิงก์: github.com/PaulStoffregen/DS1307RTC
-------------------------------------------------- ---------------
ดาวน์โหลด timeLib.h:
github.com/PaulStoffregen/Time
-------------------------------------------------- ----------------
อัปโหลดโปรแกรม
อัปโหลดโปรแกรมด้านล่างซึ่งจะตั้งเวลาเป็น RTC
//----------------------------------------------------//
 #include
 #include
 #include
 int P=A3 //Assign power pins for RTC
 int N=A2
 const char *monthName[12] = {
 'Jan', 'Feb', 'Mar', 'Apr', 'May', 'Jun',
 'Jul', 'Aug', 'Sep', 'Oct', 'Nov', 'Dec'
 }
 tmElements_t tm
 void setup() {
 pinMode(P,OUTPUT)
 pinMode(N,OUTPUT)
 digitalWrite(P,HIGH)
 digitalWrite(N,LOW)
 bool parse=false
 bool config=false
 // get the date and time the compiler was run
 if (getDate(__DATE__) && getTime(__TIME__)) {
 parse = true
 // and configure the RTC with this info
 if (RTC.write(tm)) {
 config = true
 }
 }
 Serial.begin(9600)
 while (!Serial) // wait for Arduino Serial Monitor
 delay(200)
 if (parse && config) {
 Serial.print('DS1307 configured Time=')
 Serial.print(__TIME__)
 Serial.print(', Date=')
 Serial.println(__DATE__)
 } else if (parse) {
 Serial.println('DS1307 Communication Error :-{')
 Serial.println('Please check your circuitry')
 } else {
 Serial.print('Could not parse info from the compiler, Time='')
 Serial.print(__TIME__)
 Serial.print('', Date='')
 Serial.print(__DATE__)
 Serial.println(''')
 }
 }
 void loop() {
 }
 bool getTime(const char *str)
 {
 int Hour, Min, Sec
 if (sscanf(str, '%d:%d:%d', &Hour, &Min, &Sec) != 3) return false
 tm.Hour = Hour
 tm.Minute = Min
 tm.Second = Sec
 return true
 }
 bool getDate(const char *str)
 {
 char Month[12]
 int Day, Year
 uint8_t monthIndex
 if (sscanf(str, '%s %d %d', Month, &Day, &Year) != 3) return false
 for (monthIndex = 0 monthIndex <12 monthIndex++) {
 if (strcmp(Month, monthName[monthIndex]) == 0) break
 }
 if (monthIndex >= 12) return false
 tm.Day = Day
 tm.Month = monthIndex + 1
 tm.Year = CalendarYrToTm(Year)
 return true
 }
 //----------------------------------------------------//
หลังจากอัปโหลดโค้ดแล้วให้เปิดซีเรียลมอนิเตอร์มันจะบอกว่าตั้งเวลาแล้ว
เมื่อขั้นตอนข้างต้นสำเร็จแล้วให้ไปที่ขั้นตอนต่อไป
ตอนนี้อัปโหลดรหัสด้านล่างไปยัง Arduino
รหัสโปรแกรมหลัก:
//------------Program developed by R.GIRISH------------//
#include
#include
#include
#include
#include
LiquidCrystal lcd(9, 8, 7, 6, 5, 4)
int i = 0
int H = 0
int M = 0
int S = 0
int setting_value
const int bell = 10
const int P = A3
const int N = A2
const int setting_address = 0
const int over_ride_off = 11
boolean bell_status = true
boolean Over_ride = true
//------------------- Set Bell Timings from hours 1 to 23 hrs -------------------//
//---- 1st bell ------//
 const int h1 = 0 //hours
 const int m1 = 0 //Minutes
 //---- 2nd bell ------//
 const int h2 = 0
 const int m2 = 0
 //---- 3rd bell ------//
 const int h3 = 0
 const int m3 = 0
 //---- 4th bell ------//
 const int h4 = 0
 const int m4 = 0
//---- 5th bell ------//
const int h5 = 0
const int m5 = 0
//---- 6th bell ------//
const int h6 = 0
const int m6 = 0
//---- 7th bell ------//
const int h7 = 0
const int m7 = 0
//---- 8th bell ------//
const int h8 = 0
const int m8 = 0
//---- 9th bell ------//
const int h9 = 0
const int m9 = 0
//---- 10th bell ------//
const int h10 = 0
const int m10 = 0
//---- 11th bell ------//
const int h11 = 0
const int m11 = 0
//---- 12th bell ------//
const int h12 = 0
const int m12 = 0
//---- 13th bell ------//
const int h13 = 0
const int m13 = 0
//---- 14th bell ------//
const int h14 = 0
const int m14 = 0
//---- 15th bell ------//
const int h15 = 0
const int m15 = 0
//---- 16th bell ------//
const int h16 = 0
const int m16 = 0
//--------------- bell ring lenght in seconds -------//
const int Lenght = 3 //in seconds
//-------------------------- -------------------------//
void setup()
{
lcd.begin(16, 2)
pinMode(P, OUTPUT)
pinMode(N, OUTPUT)
pinMode(bell, OUTPUT)
pinMode(over_ride_off, INPUT)
digitalWrite(P, HIGH)
digitalWrite(N, LOW)
digitalWrite(over_ride_off, HIGH)
attachInterrupt(0, over_ride, RISING)
attachInterrupt(1, bell_setting, RISING)
if (EEPROM.read(setting_address) != 1)
{
bell_setting()
}
}
void loop()
{
tmElements_t tm
lcd.clear()
if (RTC.read(tm))
{
H = tm.Hour
M = tm.Minute
S = tm.Second
lcd.setCursor(0, 0)
lcd.print('TIME:')
lcd.print(tm.Hour)
lcd.print(':')
lcd.print(tm.Minute)
lcd.print(':')
lcd.print(tm.Second)
lcd.setCursor(0, 1)
lcd.print('DATE:')
lcd.print(tm.Day)
lcd.print('/')
lcd.print(tm.Month)
lcd.print('/')
lcd.print(tmYearToCalendar(tm.Year))
} else {
if (RTC.chipPresent())
{
lcd.setCursor(0, 0)
lcd.print('RTC stopped!!!')
lcd.setCursor(0, 1)
lcd.print('Run SetTime code')
} else {
lcd.clear()
lcd.setCursor(0, 0)
lcd.print('Read error!')
lcd.setCursor(0, 1)
lcd.print('Check circuitry!')
}
}
if (EEPROM.read(setting_address) == 1)
{
if (H == 0 && M == 0 && S == 0)
{
digitalWrite(bell, LOW)
}
if (H == h1 && M == m1 && S == 0)
{
for (i = 0 i
digitalWrite(bell, HIGH)
delay(1000)
}
digitalWrite(bell, LOW)
i = 0
}
if (H == h2 && M == m2 && S == 0)
{
for (i = 0 i
digitalWrite(bell, HIGH)
delay(1000)
}
digitalWrite(bell, LOW)
i = 0
}
if (H == h3 && M == m3 && S == 0)
{
for (i = 0 i
digitalWrite(bell, HIGH)
delay(1000)
}
digitalWrite(bell, LOW)
i = 0
}
if (H == h4 && M == m4 && S == 0)
{
for (i = 0 i
digitalWrite(bell, HIGH)
delay(1000)
}
digitalWrite(bell, LOW)
i = 0
}
if (H == h5 && M == m5 && S == 0)
{
for (i = 0 i
digitalWrite(bell, HIGH)
delay(1000)
}
digitalWrite(bell, LOW)
i = 0
}
if (H == h6 && M == m6 && S == 0)
{
for (i = 0 i
digitalWrite(bell, HIGH)
delay(1000)
}
digitalWrite(bell, LOW)
i = 0
}
if (H == h7 && M == m7 && S == 0)
{
for (i = 0 i
digitalWrite(bell, HIGH)
delay(1000)
}
digitalWrite(bell, LOW)
i = 0
}
if (H == h8 && M == m8 && S == 0)
{
for (i = 0 i
digitalWrite(bell, HIGH)
delay(1000)
}
digitalWrite(bell, LOW)
i = 0
}
if (H == h9 && M == m9 && S == 0)
{
for (i = 0 i
digitalWrite(bell, HIGH)
delay(1000)
}
digitalWrite(bell, LOW)
i = 0
}
if (H == h10 && M == m10 && S == 0)
{
for (i = 0 i
digitalWrite(bell, HIGH)
delay(1000)
}
digitalWrite(bell, LOW)
i = 0
}
if (H == h11 && M == m11 && S == 0)
{
for (i = 0 i
digitalWrite(bell, HIGH)
delay(1000)
}
digitalWrite(bell, LOW)
i = 0
}
if (H == h12 && M == m12 && S == 0)
{
for (i = 0 i
digitalWrite(bell, HIGH)
delay(1000)
}
digitalWrite(bell, LOW)
i = 0
}
if (H == h13 && M == m13 && S == 0)
{
for (i = 0 i
digitalWrite(bell, HIGH)
delay(1000)
}
digitalWrite(bell, LOW)
i = 0
}
if (H == h14 && M == m14 && S == 0)
{
for (i = 0 i
digitalWrite(bell, HIGH)
delay(1000)
}
digitalWrite(bell, LOW)
i = 0
}
if (H == h15 && M == m15 && S == 0)
{
for (i = 0 i
digitalWrite(bell, HIGH)
delay(1000)
}
digitalWrite(bell, LOW)
i = 0
}
if (H == h16 && M == m16 && S == 0)
{
for (i = 0 i
digitalWrite(bell, HIGH)
delay(1000)
}
digitalWrite(bell, LOW)
i = 0
}
}
delay(1000)
}
void over_ride()
{
lcd.clear()
while (Over_ride)
{
digitalWrite(bell, HIGH)
lcd.setCursor(0, 0)
lcd.print('Press Exit to')
lcd.setCursor(0, 1)
lcd.print('Stop the bell!!!')
if (digitalRead(over_ride_off) == LOW)
{
Over_ride = false
digitalWrite(bell, LOW)
}
}
Over_ride = true
}
void bell_setting()
{
setting_value = 0
EEPROM.write(setting_address, setting_value)
lcd.clear()
while (bell_status)
{
lcd.setCursor(0, 0)
lcd.print('Bell is Disabled')
lcd.setCursor(0, 1)
lcd.print('Press Exit.')
if (digitalRead(over_ride_off) == LOW)
{
bell_status = false
}
}
bell_status = true
setting_value = 1
EEPROM.write(setting_address, setting_value)
}
//------------Program developed by R.GIRISH------------//
หลังจากอัปโหลดโค้ดด้านบนคุณจะเห็นเวลาเป็นชั่วโมงบนหน้าจอ
สรุปรหัสโปรแกรม
วิธีใช้ระบบกระดิ่งอัตโนมัตินี้:
ดำเนินการนี้ด้วยการตั้งค่าฮาร์ดแวร์ที่เสร็จสมบูรณ์
1. อัปโหลดรหัส“ การตั้งเวลา” ก่อนแล้วเปิดจอภาพอนุกรม
2. ในโปรแกรมหลักตั้งเวลาที่รีเลย์ต้องถูกเรียกที่นี่
//---- 1st bell ------//
const int h1 = 0 //hours
const int m1 = 0 //Minutes
//---- 2nd bell ------//
const int h2 = 0
const int m2 = 0
//---- 3rd bell ------//
const int h3 = 0
const int m3 = 0
//---- 4th bell ------//
const int h4 = 0
const int m4 = 0
•ตั้งค่า h1 เป็นชั่วโมงตั้งแต่ 1 ถึง 23 ชั่วโมงและ m1 เป็นนาทีจาก 0 ถึง 59
•เหมือนกันสำหรับ h1 ถึง h16 และ m1 ถึง m16
•หากคุณต้องการปิดใช้งานค่าการปล่อยระฆังบางค่า h = 0 และ m = 0 เช่น: h5 = 0 และ m5 = 0 ศูนย์จะปิดการใช้งานระฆังนั้น
3. กำหนดระยะเวลาในการเปิดและปิดเสียงระฆังได้ที่นี่:
// --------------- ความยาวของกริ่งเป็นวินาที ------- //
const int Lenght = 3 // เป็นวินาที
โดยค่าเริ่มต้นจะตั้งค่าไว้ 3 วินาที เมื่อถึงเวลาที่ตั้งไว้ รีเลย์ จะเปิดเป็นเวลา 3 วินาทีและดับลง เปลี่ยนสิ่งนี้หากคุณต้องการ
4. อัปโหลดโค้ดที่แก้ไขไปยัง Arduino
5. หากต้องการปิดการใช้งานระฆังให้กด 'ปุ่มปิดการใช้งานระฆัง' หากต้องการเปิดใช้งานอีกครั้งให้กดปุ่ม“ ออก”
6. ในการกดกริ่งด้วยตนเองให้กด 'สวิตช์กระดิ่งแบบแมนนวล' และเพื่อหยุดกระดิ่งให้กด 'ออก'
สรุปโครงการนี้หากคุณมีคำถามใด ๆ เกี่ยวกับโครงการนี้อย่าลังเลที่จะแสดงความคิดเห็นในส่วนความคิดเห็น
ก่อนหน้านี้: สร้างค้างคาวยุงโดยไม่ต้องใช้แบตเตอรี่ ถัดไป: วิธีสร้างระบบการเข้าร่วมที่ใช้ RFID